Orange cake and its icing many tips for beginners. Cake Icing tips and tricks -- Need help with icing or frosting a cake? Make a simple and easy chocolate orange cake for any occasion with this tutorial with step by step instructions and helpful tips and tricks. Orange icing is a fun, fresh, and delicious way to top cookies, cakes, and other desserts.
 A whole orange is boiled and puréed to make a rich marmalade-y cake which is lightly spiced and decorated with Transfer to a bowl and set aside, reserving two tablespoons for the icing.
Add the remaining cake ingredients Decorate the cake with the candied orange rind and serve.
Orange cake recipe with step by step photos.
You can cook Orange cake and its icing many tips for beginners using 17 ingredients and 17 steps. Here is how you cook that.
A whole orange is boiled and puréed to make a rich marmalade-y cake which is lightly spiced and decorated with Transfer to a bowl and set aside, reserving two tablespoons for the icing.
Add the remaining cake ingredients Decorate the cake with the candied orange rind and serve.
Orange cake recipe with step by step photos.
You can cook Orange cake and its icing many tips for beginners using 17 ingredients and 17 steps. Here is how you cook that.
Ingredients of Orange cake and its icing many tips for beginners
- You need of For cake.
- Prepare 2 cup of maida(All purpose flour) /white flour / cake flour.
- Prepare 4 of large eggs.
- Prepare 1 cup of sugar.
- Prepare 1 cup of oil.
- Prepare 3 tsp of baking powder.
- It's 1 tsp of orange essence.
- You need As needed of orange food colour.
- You need 1/2 cup of orange juice.
- You need of For icing (whipped cream).
- You need 1 1/2 cup of sweetened whipping cream.
- You need 1 tsp of orange essence.
- It's as needed of Food colour of your choice.
- Prepare of For icing (glaze).
- Prepare 1/2 cup of orange juice.
- You need 1 tsp of corn flour.
- Prepare 1 tsp of sugar.
This is easy, simple and no fuss recipe to make vegan Get My Secrets to Great Indian Food. Sign up for my FREE Beginners Guide to Delicious Indian You can even frost the cake with some orange whipped cream or butter icing. I kept it plain as we like it. How do you make a Creamsicle even better?
Orange cake and its icing many tips for beginners instructions
- Measure all the ingredients and keep them ready. Preheat oven at 180c. Sift baking powder and flour together. Wash eggs. Separate egg yolk and egg white. For that, you need to crack apart the egg, keep holding the yolk in the shells and let the egg white fall in the bowl underneath. You can gently shift the yolk from one shell to the other to drain out the egg white completely. Ensure not a bit of yolk falls into the white..
- Drop the yolk in a separate bowl. Transfer the egg yolks in a cake mixing bowl. Run the electric mixer in it just to beat break them..
- Add orange juice and mix. Then add sugar and beat until the sugar granules are completely dissolved. Feel a drop of the mixture between your thumb and finger to ensure that. Add oil and beat again till the mixture looks light and frothy..
- See the air bubbles in the batter ? 😎Keep it aside. Now start whisking the egg white using the electric whisker. Continue to whisk till you get soft peaks. Keep it aside..
- Now start adding a little flour at a time in our original batter mixer (that has yolks, sugar, juice and oil). You may want to mix gently and fold using a wooden spetula in order not to break the air bubbles. If you want to use the electric whisker, ensure that you do not over eat, just beat until the flour is combined well with the batter and no dry lumps are seen. Add the essence and colour. Combine well. Then add the whisked egg white to the batter. Gently combine it using an electric whisker.
- Run the whisker only till everything is combined and the batter looks evenly smooth. Grease a cake tin. Pour the batter in it maximum till 1/2 or a little more than that level. (I used double measures of this recipe as I was to serve it in a party. That's why my tray is big)..
- Quickly slide the tray in the oven if it's ready (if not, wait till it's ready). Bake for 30 min more/less. Be alert after 20 min. Look for following signs - 1. The cake aroma starts to spread in the kitchen. 2. The sides of the cake leaves the tray. 3. The sides look darker than the rest of the cake. 4. The surface of the cake changes colour. 5. The middle of the cake doesn't feel wet upon touching. 6. The knife poked in the centre comes out clean..
- Let it cool completely. Run a knife around the edges to separate the cake from the tray completely. Turn the tray upside down over a rake or a another tray, tap gently and shake a bit to remove the cake from the tray. If you do this step while the cake is still hot, there are chances of it breaking. If it is urgent to remove, you can put a wet towel on the tray (after turning it upside down asif to remove cake) to cut down the time for cooling..
- The cake is ready. Let it cool completely on the rake. Do icing only after it is completely cooled or else the icing will melt down. Some tips : 1. Measure the ingredients accurately. 2. You can replace orange juice/essence/colour with any other fruit juice/essence/colour such as pineapple, strawberry, mango, etc. Juice can be readymade or homemade. 3. Whisking egg white to soft peak and then adding in the batter adds more air to the batter and makes our cake spongier and softer..
- For icing, take the cream in a deep Vassel. Chill in freezer Add essence. AVOID ADDING ANYOTHER LIQUID LIKE JUICE FOR FLAVOUR. Whip the cream with an electric whisker till stiff. Properly whisked cream will not fall out even when you tip over the vassel. DO NOT OVERWHISK OR ELSE IT WILL TURN INTO BUTTER ! Divide the cream into as many portions as the variety of colour you want. I used white, green and pink. Add colours and whisk again to mix. Keep them refrigerated until you are ready for icing..
- Place your cake on the cake board. I just used my baking tray upside down (jugaad 🤭). Level it by cutting if it is puffed in the middle. My levelling didn't turn out to be good, so I just flipped the cake over and got an evenly levelled surface 😉!.
- Apply cream all around the cake. I didn't cut the cake at the middle for an extra layer of cream as my cake was too big to take that risk as a first timer. But you can cut it fearlessly if yours is manageably small. Mid layer of cream makes a big difference in the taste and texture. If you are doing so, do that step first and then apply cream on the top and all around. Smoothen it as much as possible using a spread knife..
- Prepare glaze now as it has to be used when warm or else it thickens too much. To prepare it, combine juice and corn flour really well. There must be no lumps. Pour the mixture in a non stick pan. Add sugar. Cook on low flame while constantly stirring till the mixture thickens enough to stick on the spatula and gets a string consistency. Let it cool down from hot to warm..
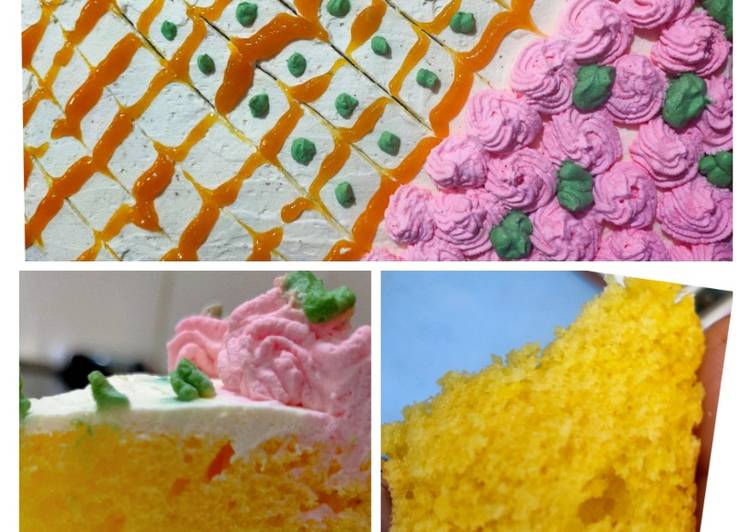
- Take out the glaze in a clear plastic bag. Pour the glaze in it. Bring all the glaze down to a corner of the bag. Cut a tiny hole at the corner (ensure not to hold squeeze the bag while cutting or else your glaze will splash out.) By squeezing the bag in your feast, draw lines across the cake. My lines are a bit thick as I ended up snipping off a bit too much! First timer's mess 🤭!.
- Take a tooth pick and draw a line varticle line (from top to bottom) through all the horizontal lines of glaze. Leave a bit of distance and draw another line through, from bottom to top this time. This way, draw varticle lines from top to bottom and bottom to top alternatively till the end. This will make a nice pattern. Fix the flower attached to the piping bag and fill it up with pink cream (if you are following my design)..
- Type 1: aim the piping bag at one place keeping it quite close to the point. Squeeze out the cream at that place and lift the bag up. This should make a nice flower shape on the place. Type 2: squeeze the bag and move your hand round on an aimed place to get a circle shaped flower (what I did on my cake) Once done, I removed the remaining pink cream from the bag and refilled it with green. I changed the attachment and did another design to resemble leaves (couldn't think of any other design!).
- I covered up the sides of the cake with leaves pattern too. Wipe the mess on the board with a cloth and you are ready to serve. The cake looked beautiful. You may choose to decorate the entire cake with glaze only (that's what I had originally planned, but I fell in short of glaze and was left with much cream, so I went ahead with what I had). Glaze is highly recommended as it gives nice fruity and citrus taste to the cake and balances the sweetness. REFRIGERATE THE CAKE TILL THE TIME OF USE..
This commenting section is created and maintained by a third party, and imported onto this page. You may be able to find more information on their web site. Eggless Orange Cake recipe- is very easy to make that baking beginners can also make it. The icing is also orange flavored, so it is double dose of it. Here I have used freshly squeezed orange juice.